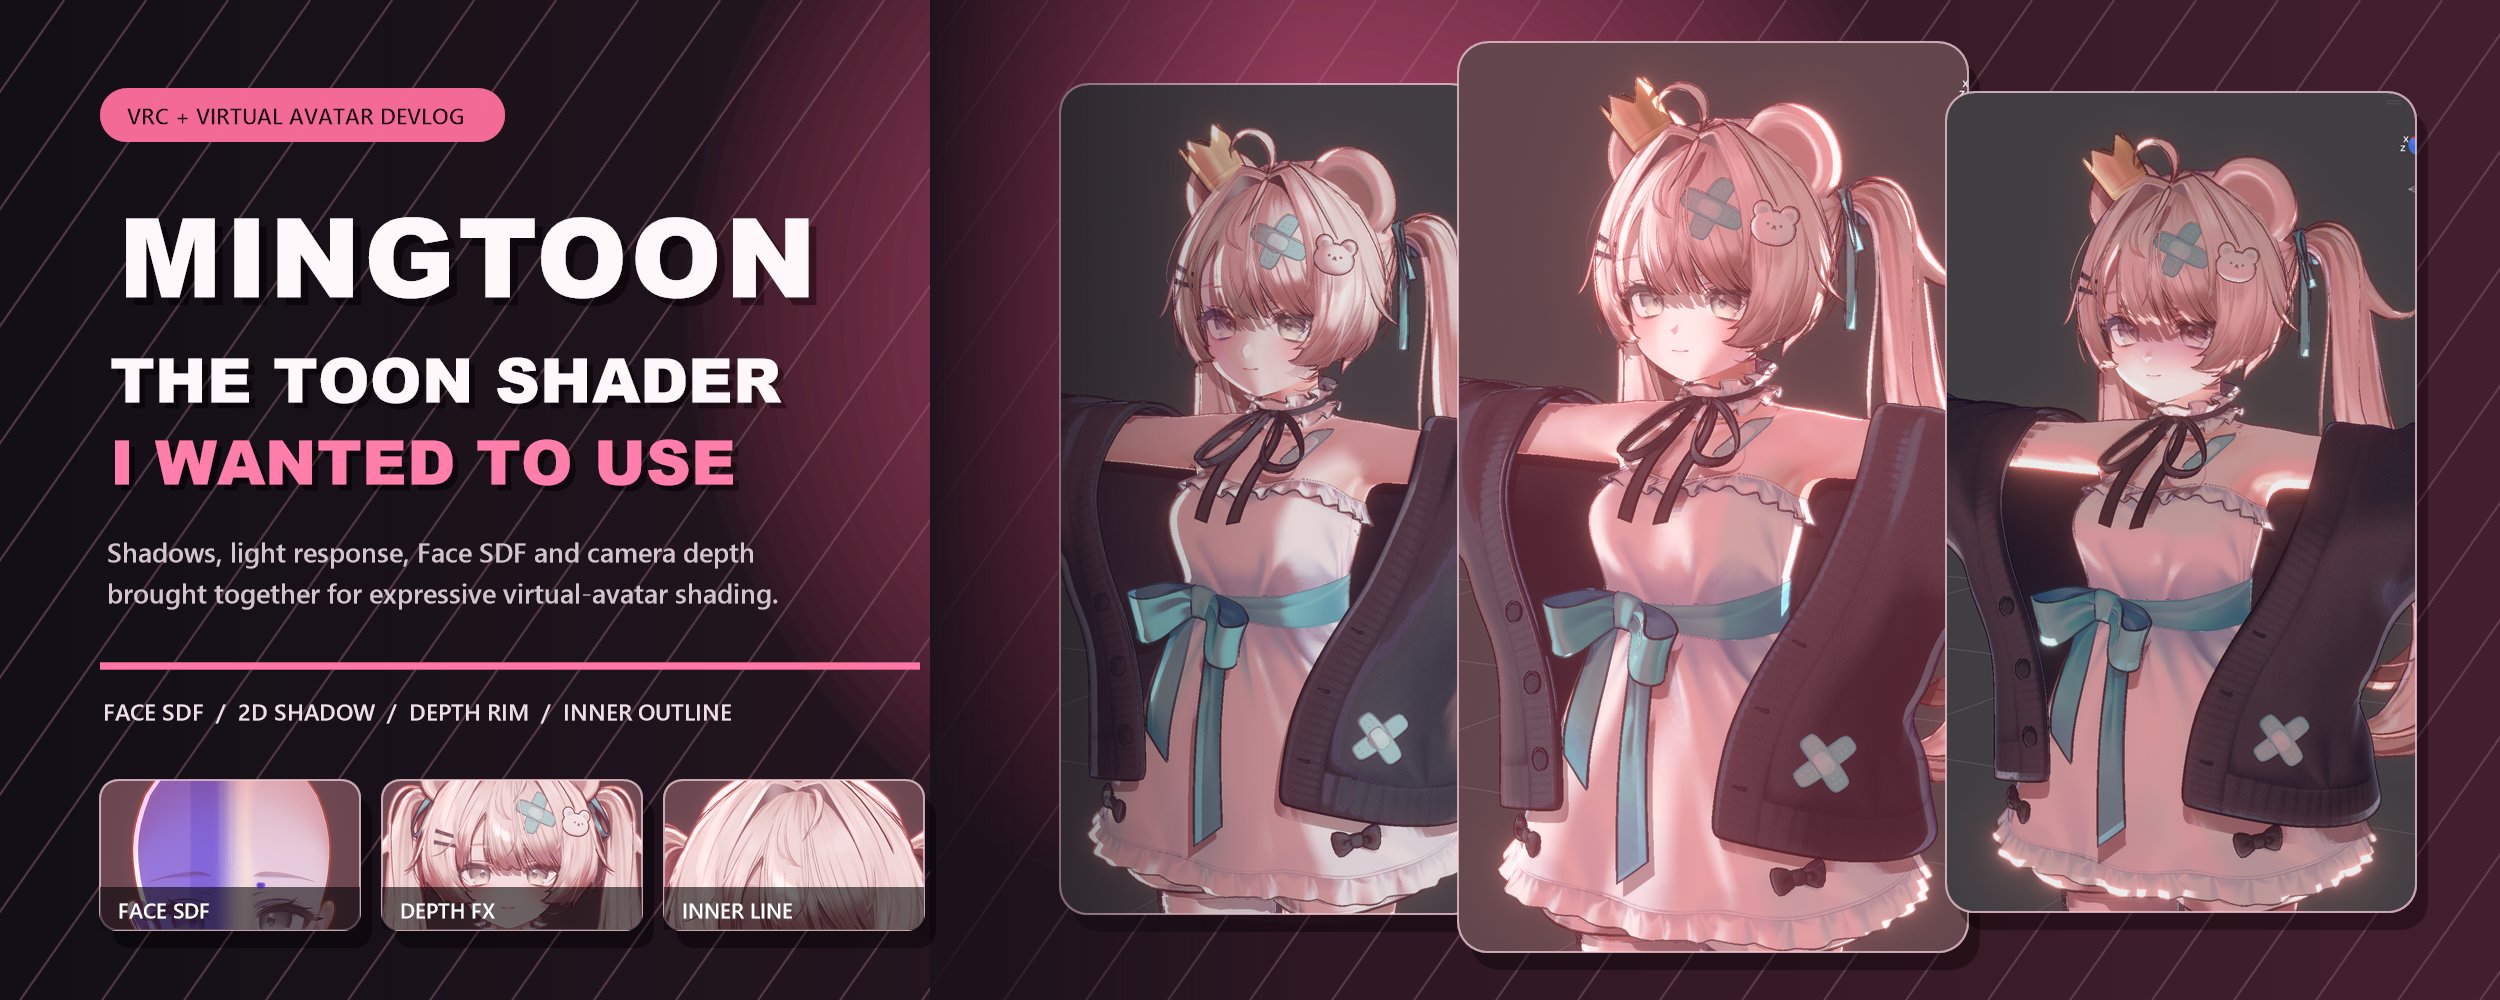
I have spent a lot of time shading characters in Warudo and other 3D applications made for virtual avatars.
I also post the results on X fairly often. Most of those posts are not product announcements. They are short records of whatever I was exploring at the time: a new way to shape facial shadows, a rim that reacts to backlighting, a MatCap treatment, or a different approach to depth-based shading.
I keep returning to shadows in particular.
How far should a shadow travel across a face before it stops looking appealing? What is the difference between a soft transition and one that feels deliberately drawn? When a character is backlit, which parts of the light should remain so the face and body do not disappear into the background?
I have used many existing toon shaders in actual projects, and I have also written smaller shaders whenever a project needed something more specific. Over time, I accumulated a list of things I loved and things I wished I could change.
One shader might produce beautiful facial shading but make it difficult to separate the colors and composition order of different shadows. Another might have excellent MatCaps and rim lighting, but change too much with camera distance or field of view. Depth-based effects could look wonderful in a controlled scene, yet become difficult to use on real characters because of self-shadowing or host-camera restrictions.
Eventually, I wanted one place where I could combine the techniques I had been building and testing separately.
That project became MingToon.
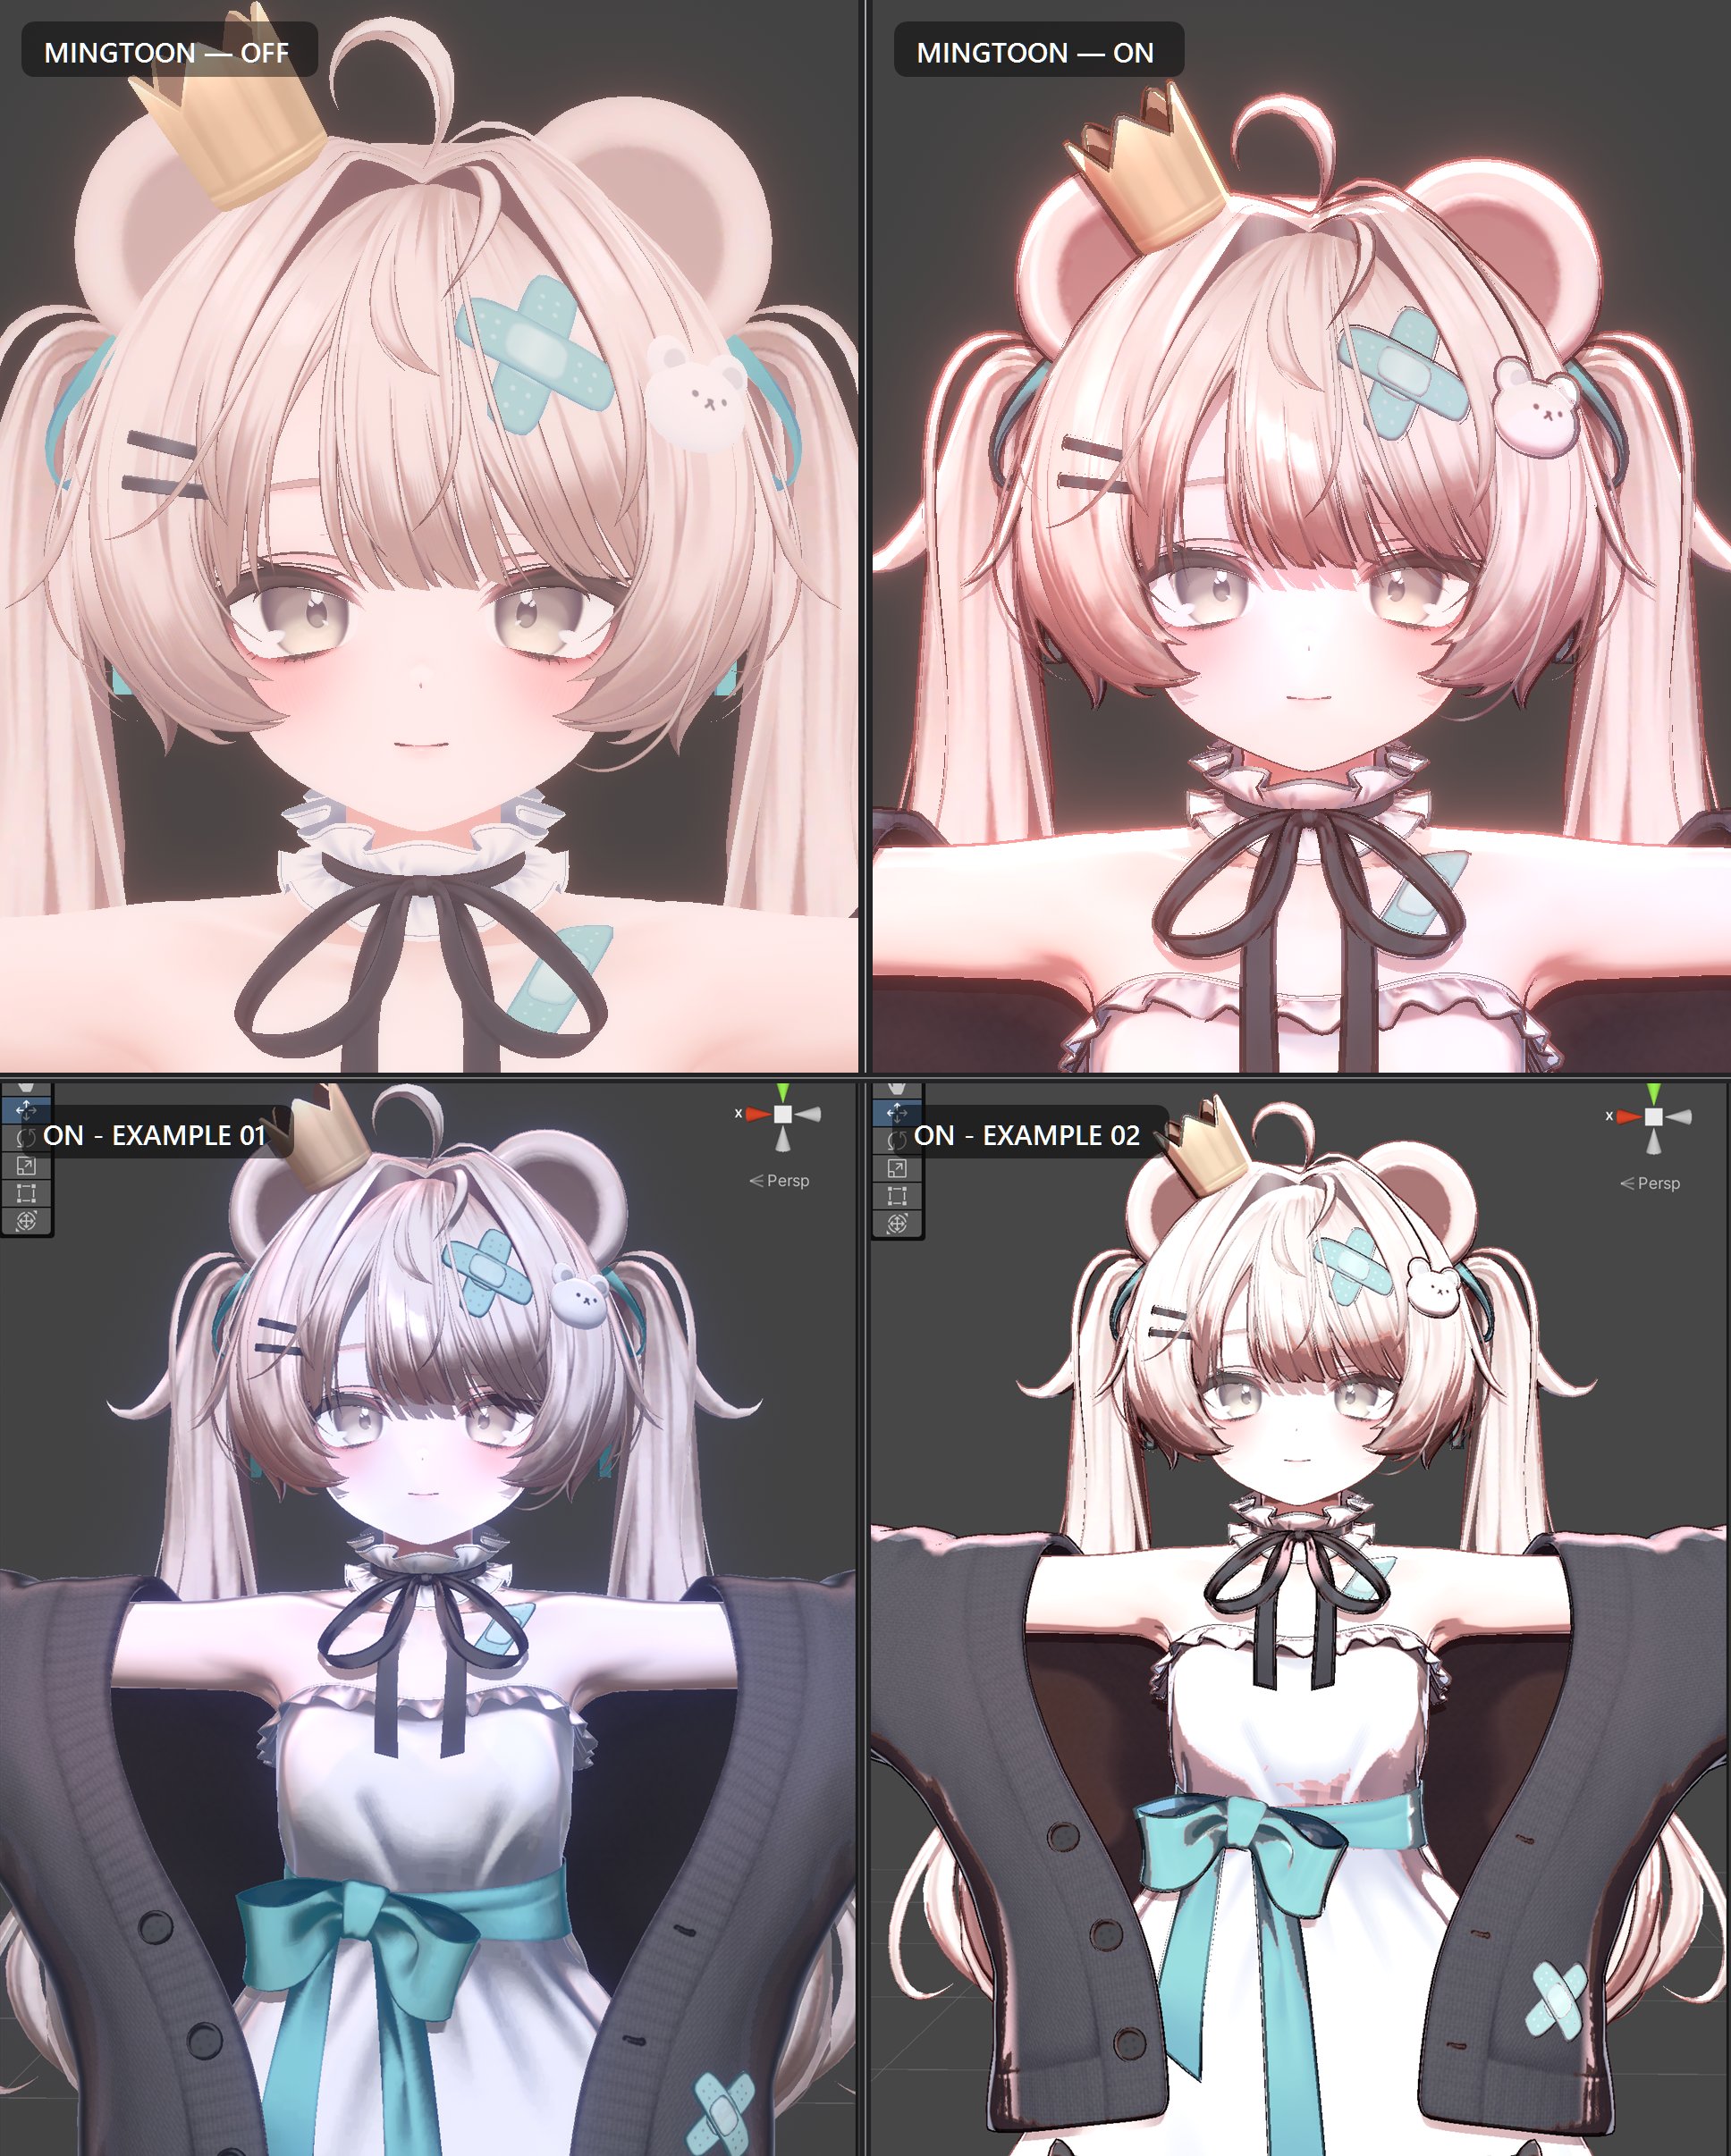
Avatar Model : https://booth.pm/ko/items/6571299
I do not think my approach is the only correct one
I have not spent most of my career working in VRChat.
My experience comes mainly from Warudo and other 3D virtual-avatar applications. MingToon started because I wanted to bring some of the shading methods I had developed in those environments into a form that more VRChat creators could also try.
VRChat already has excellent, widely used toon shaders. I am not trying to present MingToon as a replacement for every one of them, or as a new universal answer.
I also do not assume that MingToon will be the lightest or fastest toon shader available.
If a project needs only one very specific look, a small shader written for that single purpose may be faster, easier to understand, and easier to maintain. I have written many small shaders for exactly that reason.
MingToon is aimed at a different problem.
I want to gather the toon-shading techniques I have found beautiful across different projects, along with the tools I repeatedly wished I had, and make them convenient to combine in one place. The goal is not simply to accumulate features. It is to make those features cooperate as one look instead of fighting each other.
At the center of the project are shadow design, response to light direction, and camera-depth effects.
I did not want every shadow to end as the same dark color
In a toon shader, I do not think of a shadow as nothing more than an area receiving less light.
A shadow can organize the volume of the face and body. It can be part of the color design of an illustration. Sometimes it serves a role closer to line art or colored linework than to physically correct lighting.
That is why MingToon does not treat every kind of shadow as one shared dark value.
- Form Shadow is the basic, art-directed shading used to organize the character’s shape. Its purpose is not to reproduce every small change in the physical surface. It is meant to keep the major forms of the face and body readable. It supports a second shadow stage, as well as independent control over the transition width and softness.
- Cast Shadow represents actual light occlusion. It can use a different color and blend mode from the form shadow.
- The camera-depth-based 2D Shadow is treated as another independent layer. It is intended for stylized shadows cast by bangs, accessories, or nearby geometry across the face and body—shapes that are often difficult to control with a conventional shadow map alone.
If these shadows are assigned different colors, I do not want them to collapse into one color whenever they overlap in a dark region. MingToon therefore keeps their masks and colors separate and combines them in a deliberate order.
The shared shadow boundary can also have its own color, width, strength, and blur. It can be used as a natural transition, a colored border, or something closer to subtle linework.
I also added a Shadow Pattern mode for halftone and print-like shading. The pattern is not simply placed on top of the shadow as a color texture. It acts as a threshold field. As the surface becomes darker, the dots and lines grow, which produces a response closer to printed screentone than to a static overlay.
The priority is not for every shadow to be physically exact. The priority is for the shadow to organize the character beautifully.
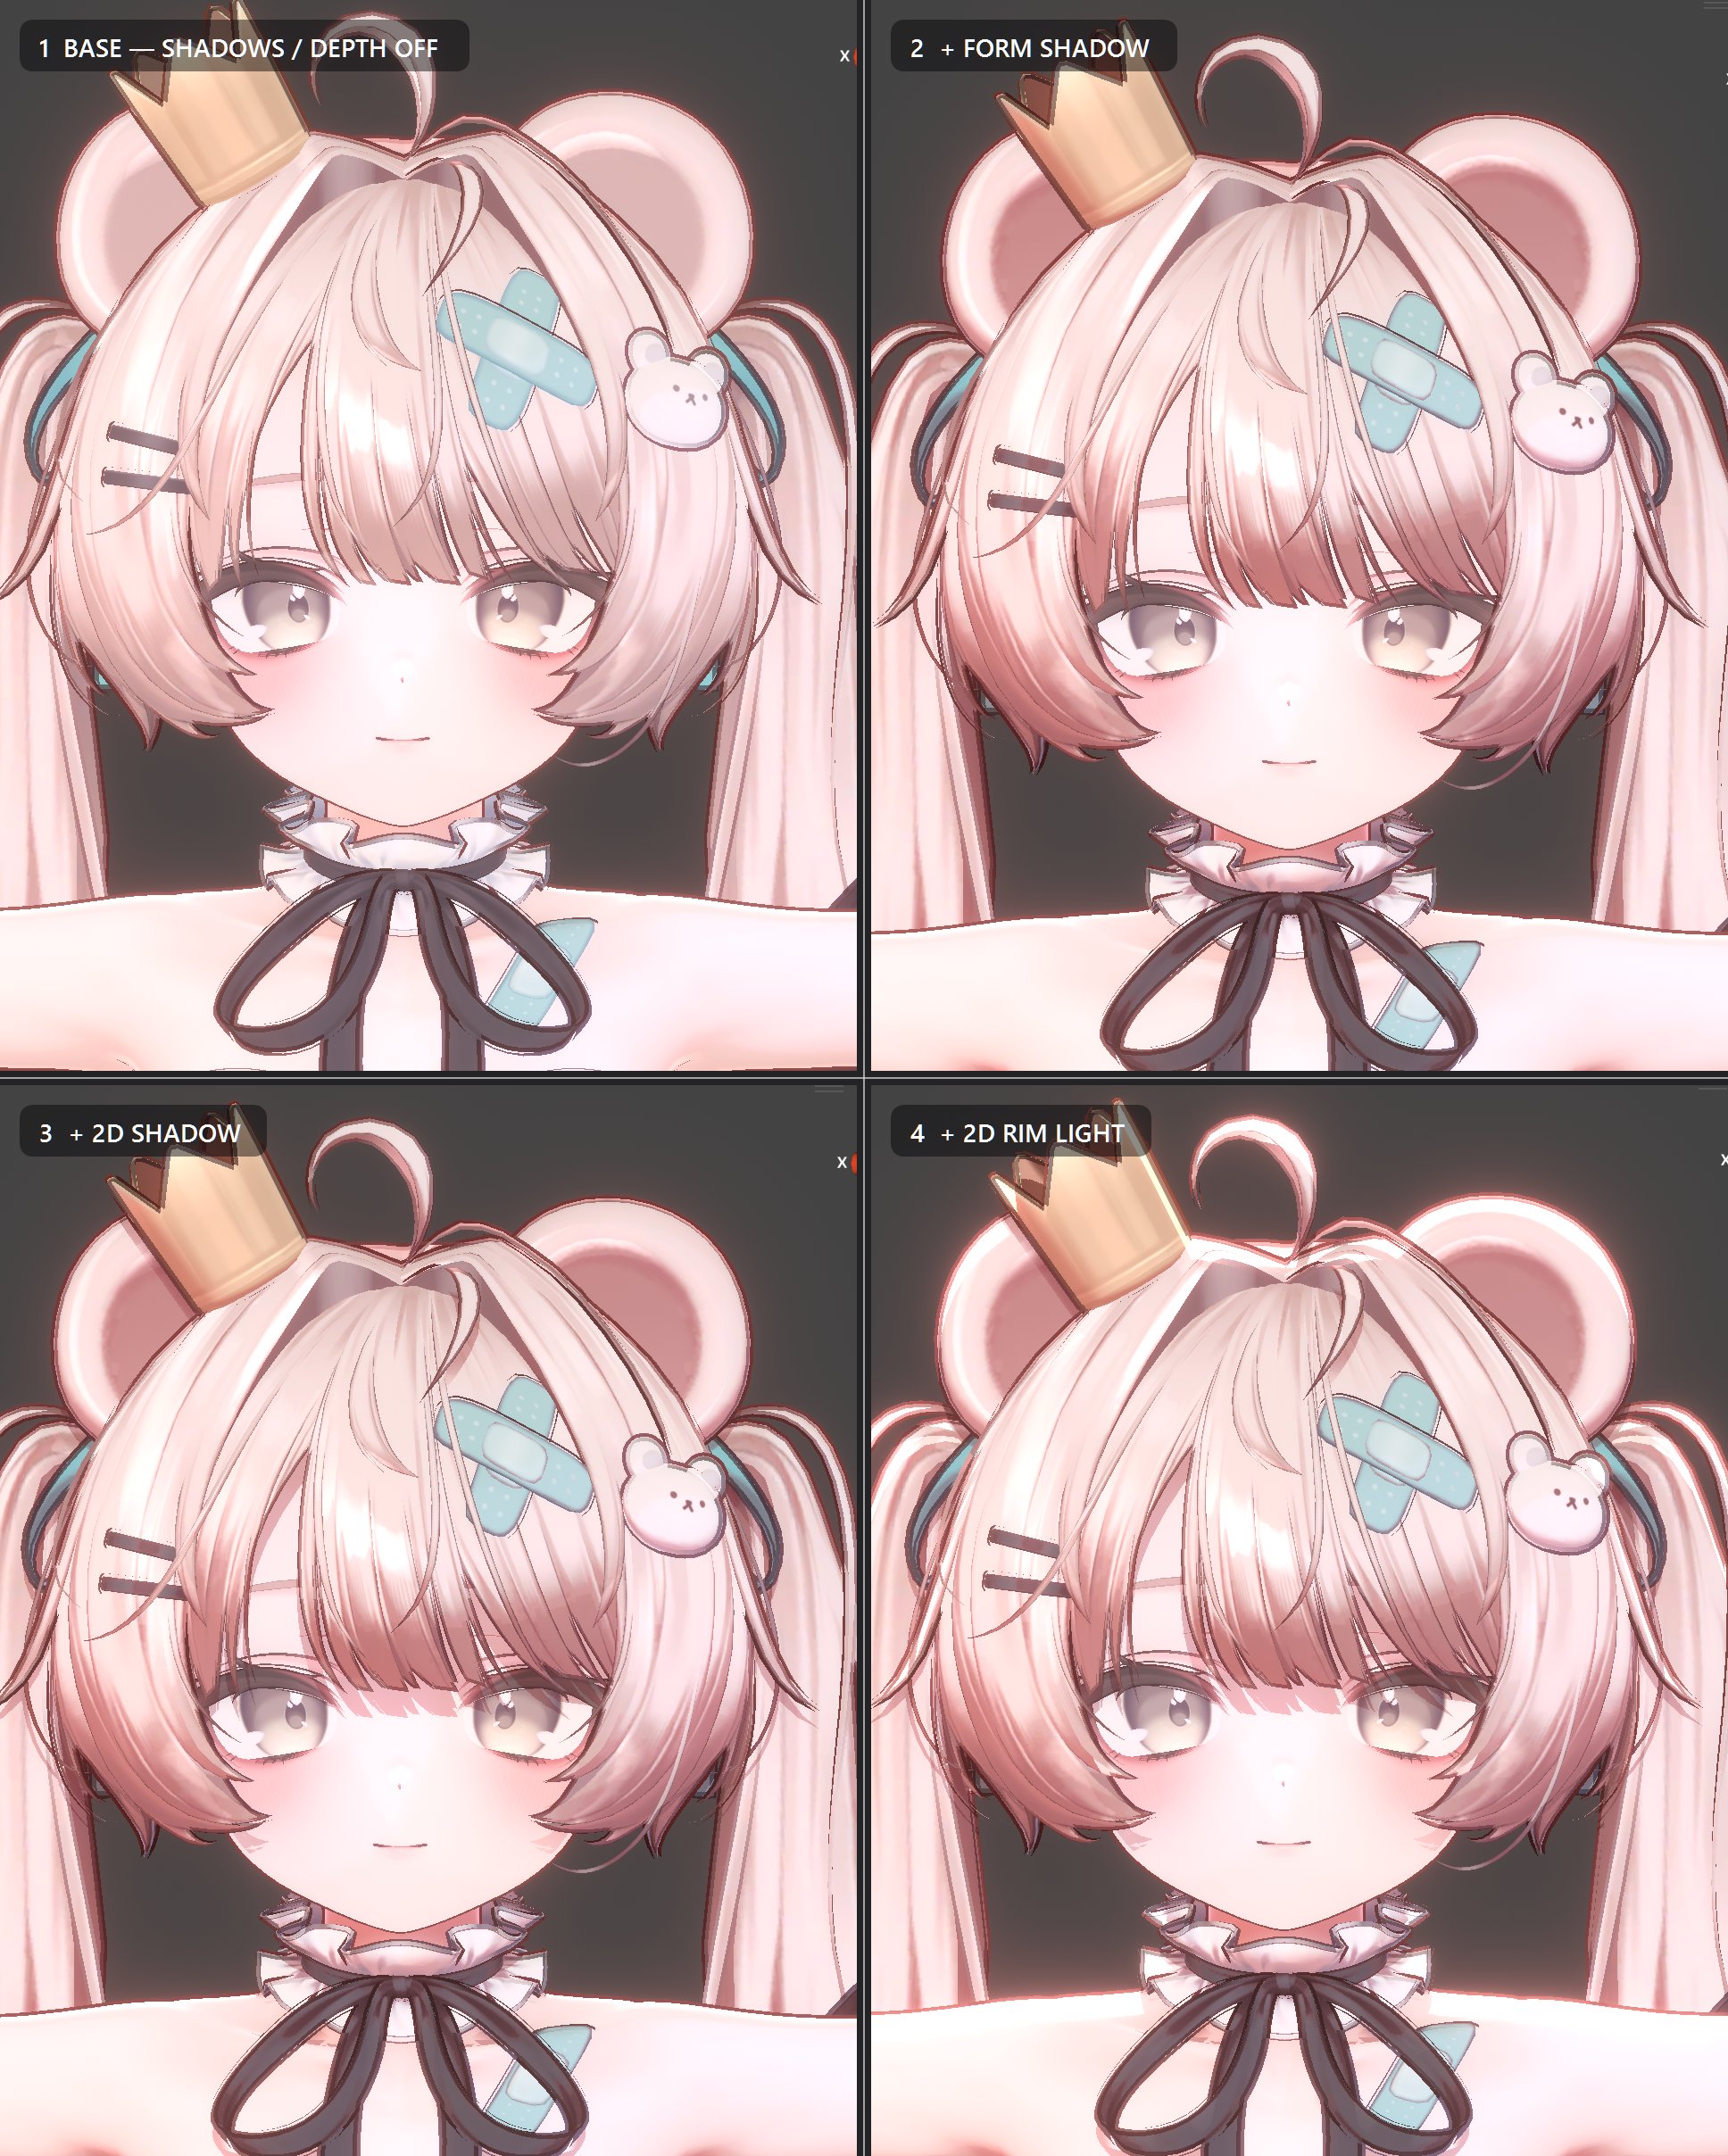
MingToon’s layered shading progression: base material, Form Shadow, 2D Shadow, and backlight-responsive 2D Rim Light. Each stage is added independently, allowing the character’s volume, depth, and silhouette lighting to be shaped without repainting the original textures.
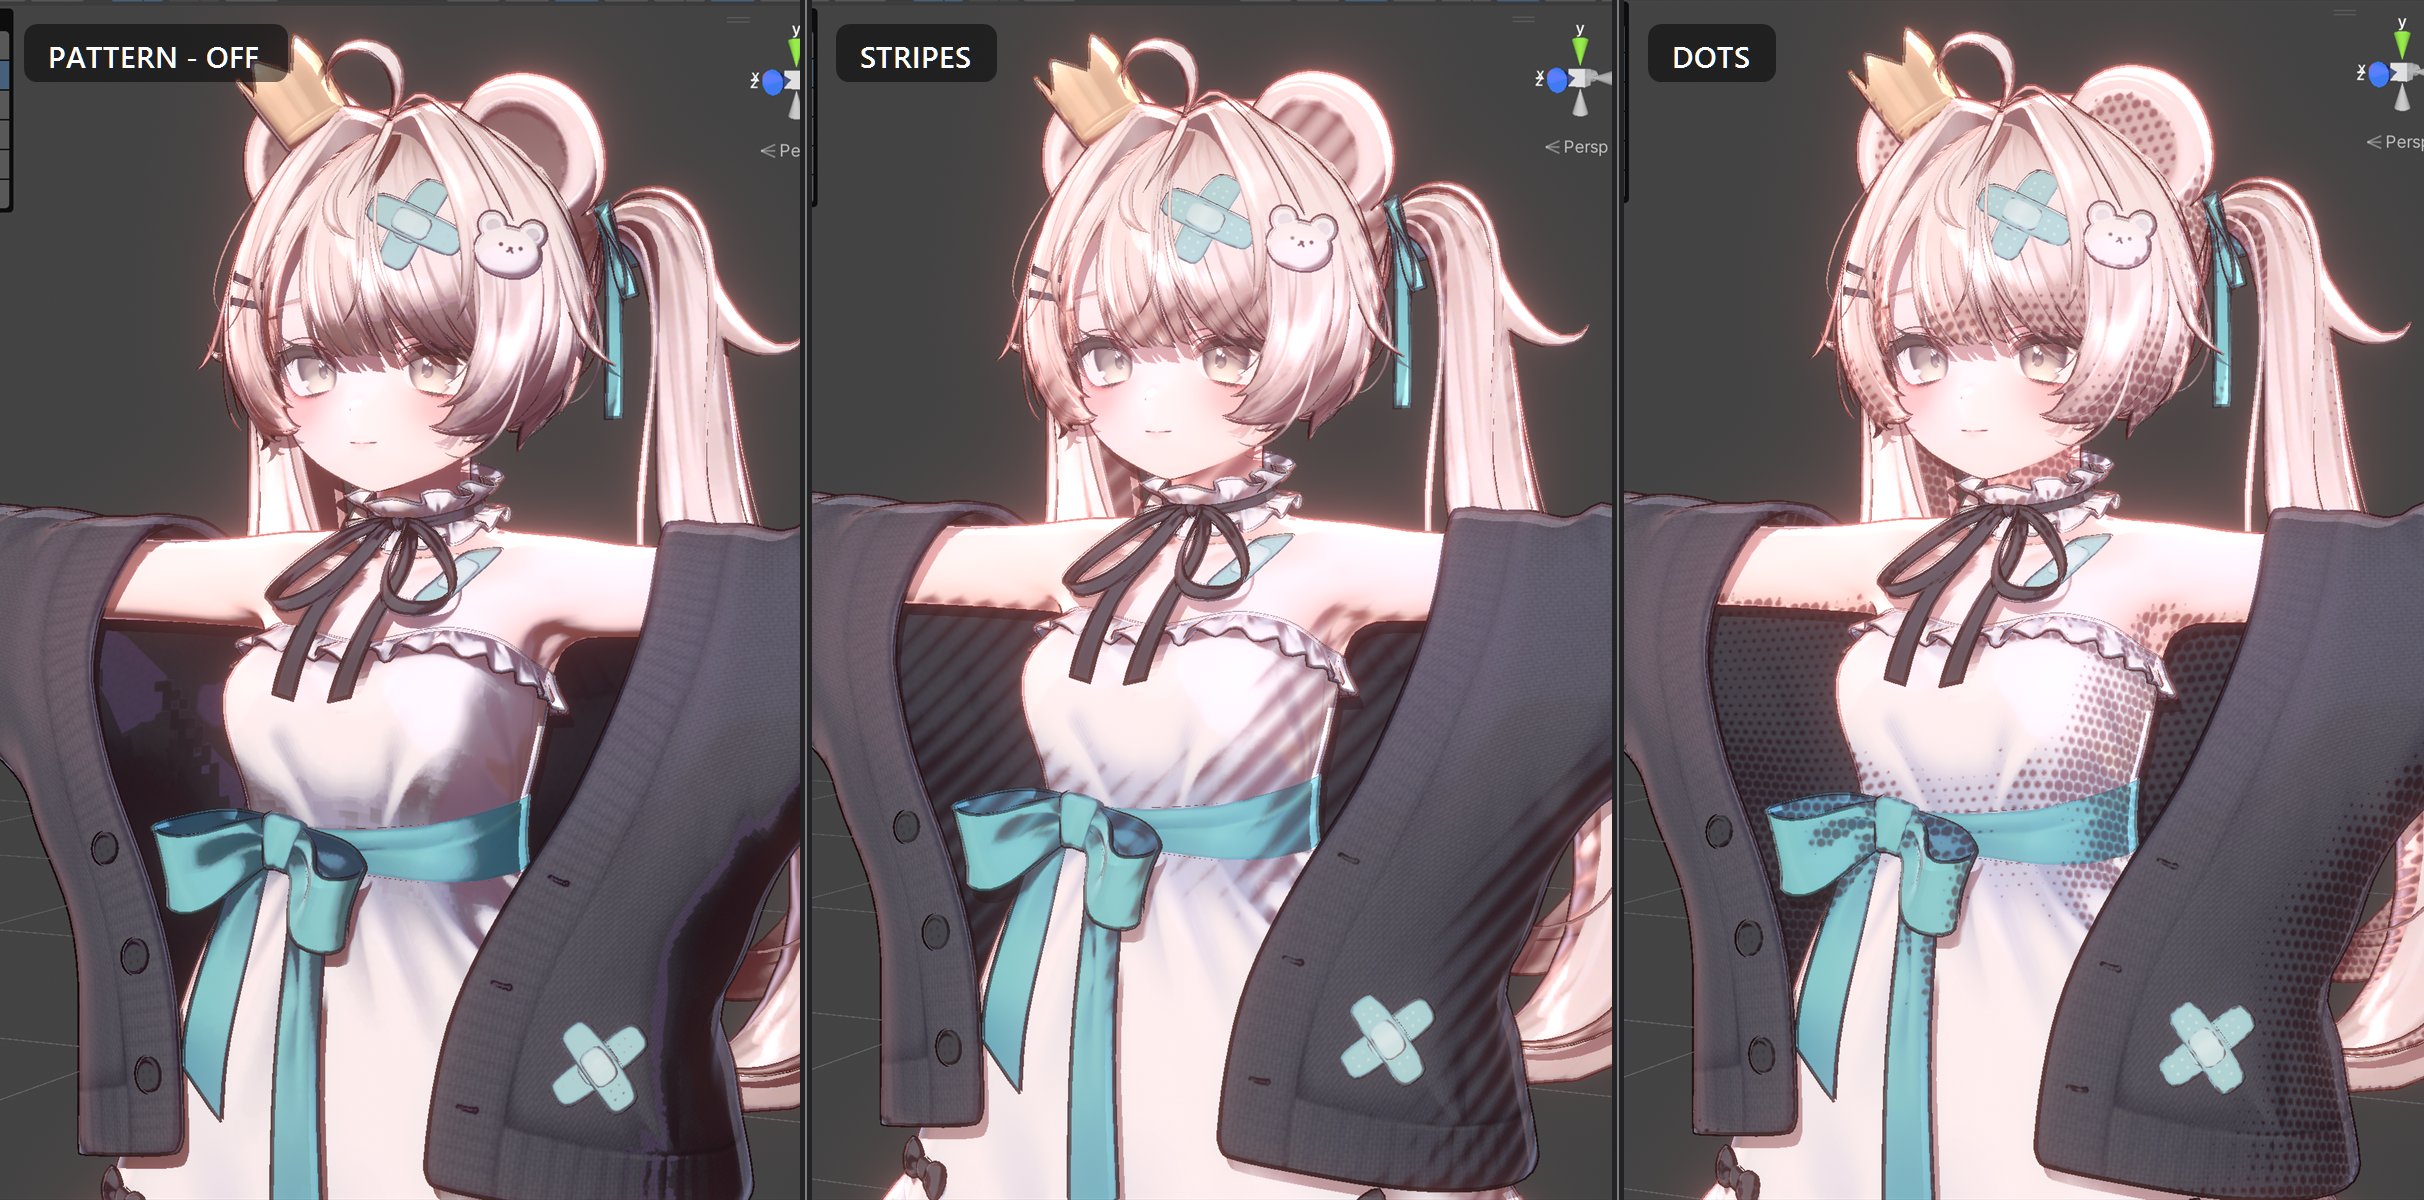
The pattern is used as a shadow threshold rather than a tint texture, so its shapes grow as the shading becomes deeper.
A RimLight that becomes stronger in backlight
I did not want rim lighting to behave like a decoration pasted around the character at a constant intensity.
Under strong frontal lighting, the character’s surface is already bright. A strong rim in that situation can make the silhouette feel unnecessarily busy.
Under backlighting, however, the face and body become darker and can easily merge with the background. That is when a stronger silhouette light becomes most useful.
MingToon’s 2D Rim therefore does more than display a camera-depth discontinuity.
It combines the silhouette mask derived from depth with the current light direction and the amount of backlighting. As the light moves behind the character, the rim can become more pronounced. Under frontal lighting, it can remain restrained.
Additional lights can also influence the rim with their own direction and color. I wanted the effect to react to the lighting around the character rather than remain attached to a single main light.
The apparent width of the rim was another important concern.
A rim tuned for a facial close-up can almost disappear in a full-body shot, or suddenly become too thick when the camera field of view changes. MingToon therefore applies camera-distance and projection compensation to the 2D Rim and related Fresnel effects.
The goal is not to preserve one exact world-space width. It is to prevent the visible region of the effect from changing too dramatically when the framing changes.
Light that remains inside the shadow
While working on backlighting, I realized that the silhouette was not the only place where I wanted light to survive. I also wanted a controlled amount of light inside the shadow itself.
When the entire shadow side collapses into one color, the structure of the face and body can disappear. Brightening the whole shadow, however, weakens the contrast that makes backlighting attractive.
This led to the Shadow Interior Reflection feature.
It does not simply add one fixed color over the shadow. It responds to the direction and color of the main light, the environment lighting, and additional lights, so it can change with the scene rather than appearing as a static decoration.
It is not meant to be a physically exact simulation of indirect illumination. It is an art-directed tool that borrows information from the real lighting environment and preserves just enough shape and color inside an anime character’s shadow.
MingToon includes Rim Shade, Fresnel Rim, 2D Rim, and Shadow Interior Reflection because they serve different purposes.
Rim Shade darkens and organizes the silhouette. Fresnel Rim creates view-dependent light. The 2D Rim combines camera depth with light direction. Shadow Interior Reflection preserves form within the dark side.
Rather than asking one rim-light equation to solve every situation, I prefer to separate the roles and let them be combined as needed.
Using depth as an illustration tool
Depth-based effects are not minor extras in MingToon. They are one of its main areas of focus.
Camera depth is usually associated with occlusion or post-processing, but in toon shading it can also become raw material for redrawing a character’s shape.
The main depth-driven features are the 2D Rim, 2D Shadow, and Inner Outline.
The 2D Rim finds the character’s silhouette from the depth difference between the character and its surroundings, then combines it with the lighting and backlight response.
The 2D Shadow compares the current surface with shifted depth samples to create stylized shadows from bangs, accessories, and nearby objects.
The Inner Outline follows visible depth changes and silhouettes to draw edges that a conventional hull outline cannot reliably capture, particularly on thin planes.
The hardest design problem in depth-based shadows is self-shadowing.
If the effect reacts too sensitively to depth differences, it finds the desired shadow but also interprets tiny changes across the face—or closely layered meshes—as occluders. If the same-surface rejection is too aggressive, useful shadows such as bangs falling over the face disappear as well.
For that reason, MingToon does not decide the 2D Shadow from one depth difference alone. It considers the receiver surface, distance response, the likelihood of sampling the same surface, and additional stabilization for the face.
The target behavior is intuitive: nearby occluders should create stronger shadows, while distant ones should gradually become lighter, without allowing the face to become dirty from uncontrolled self-shadowing.
The colored shadow boundary is also derived from the already-computed shadow coverage instead of continuously adding more depth samples.
These features are not intended to replace a conventional shadow map. They are illustration tools for graphic effects that are difficult to obtain from real-time cast shadows alone.
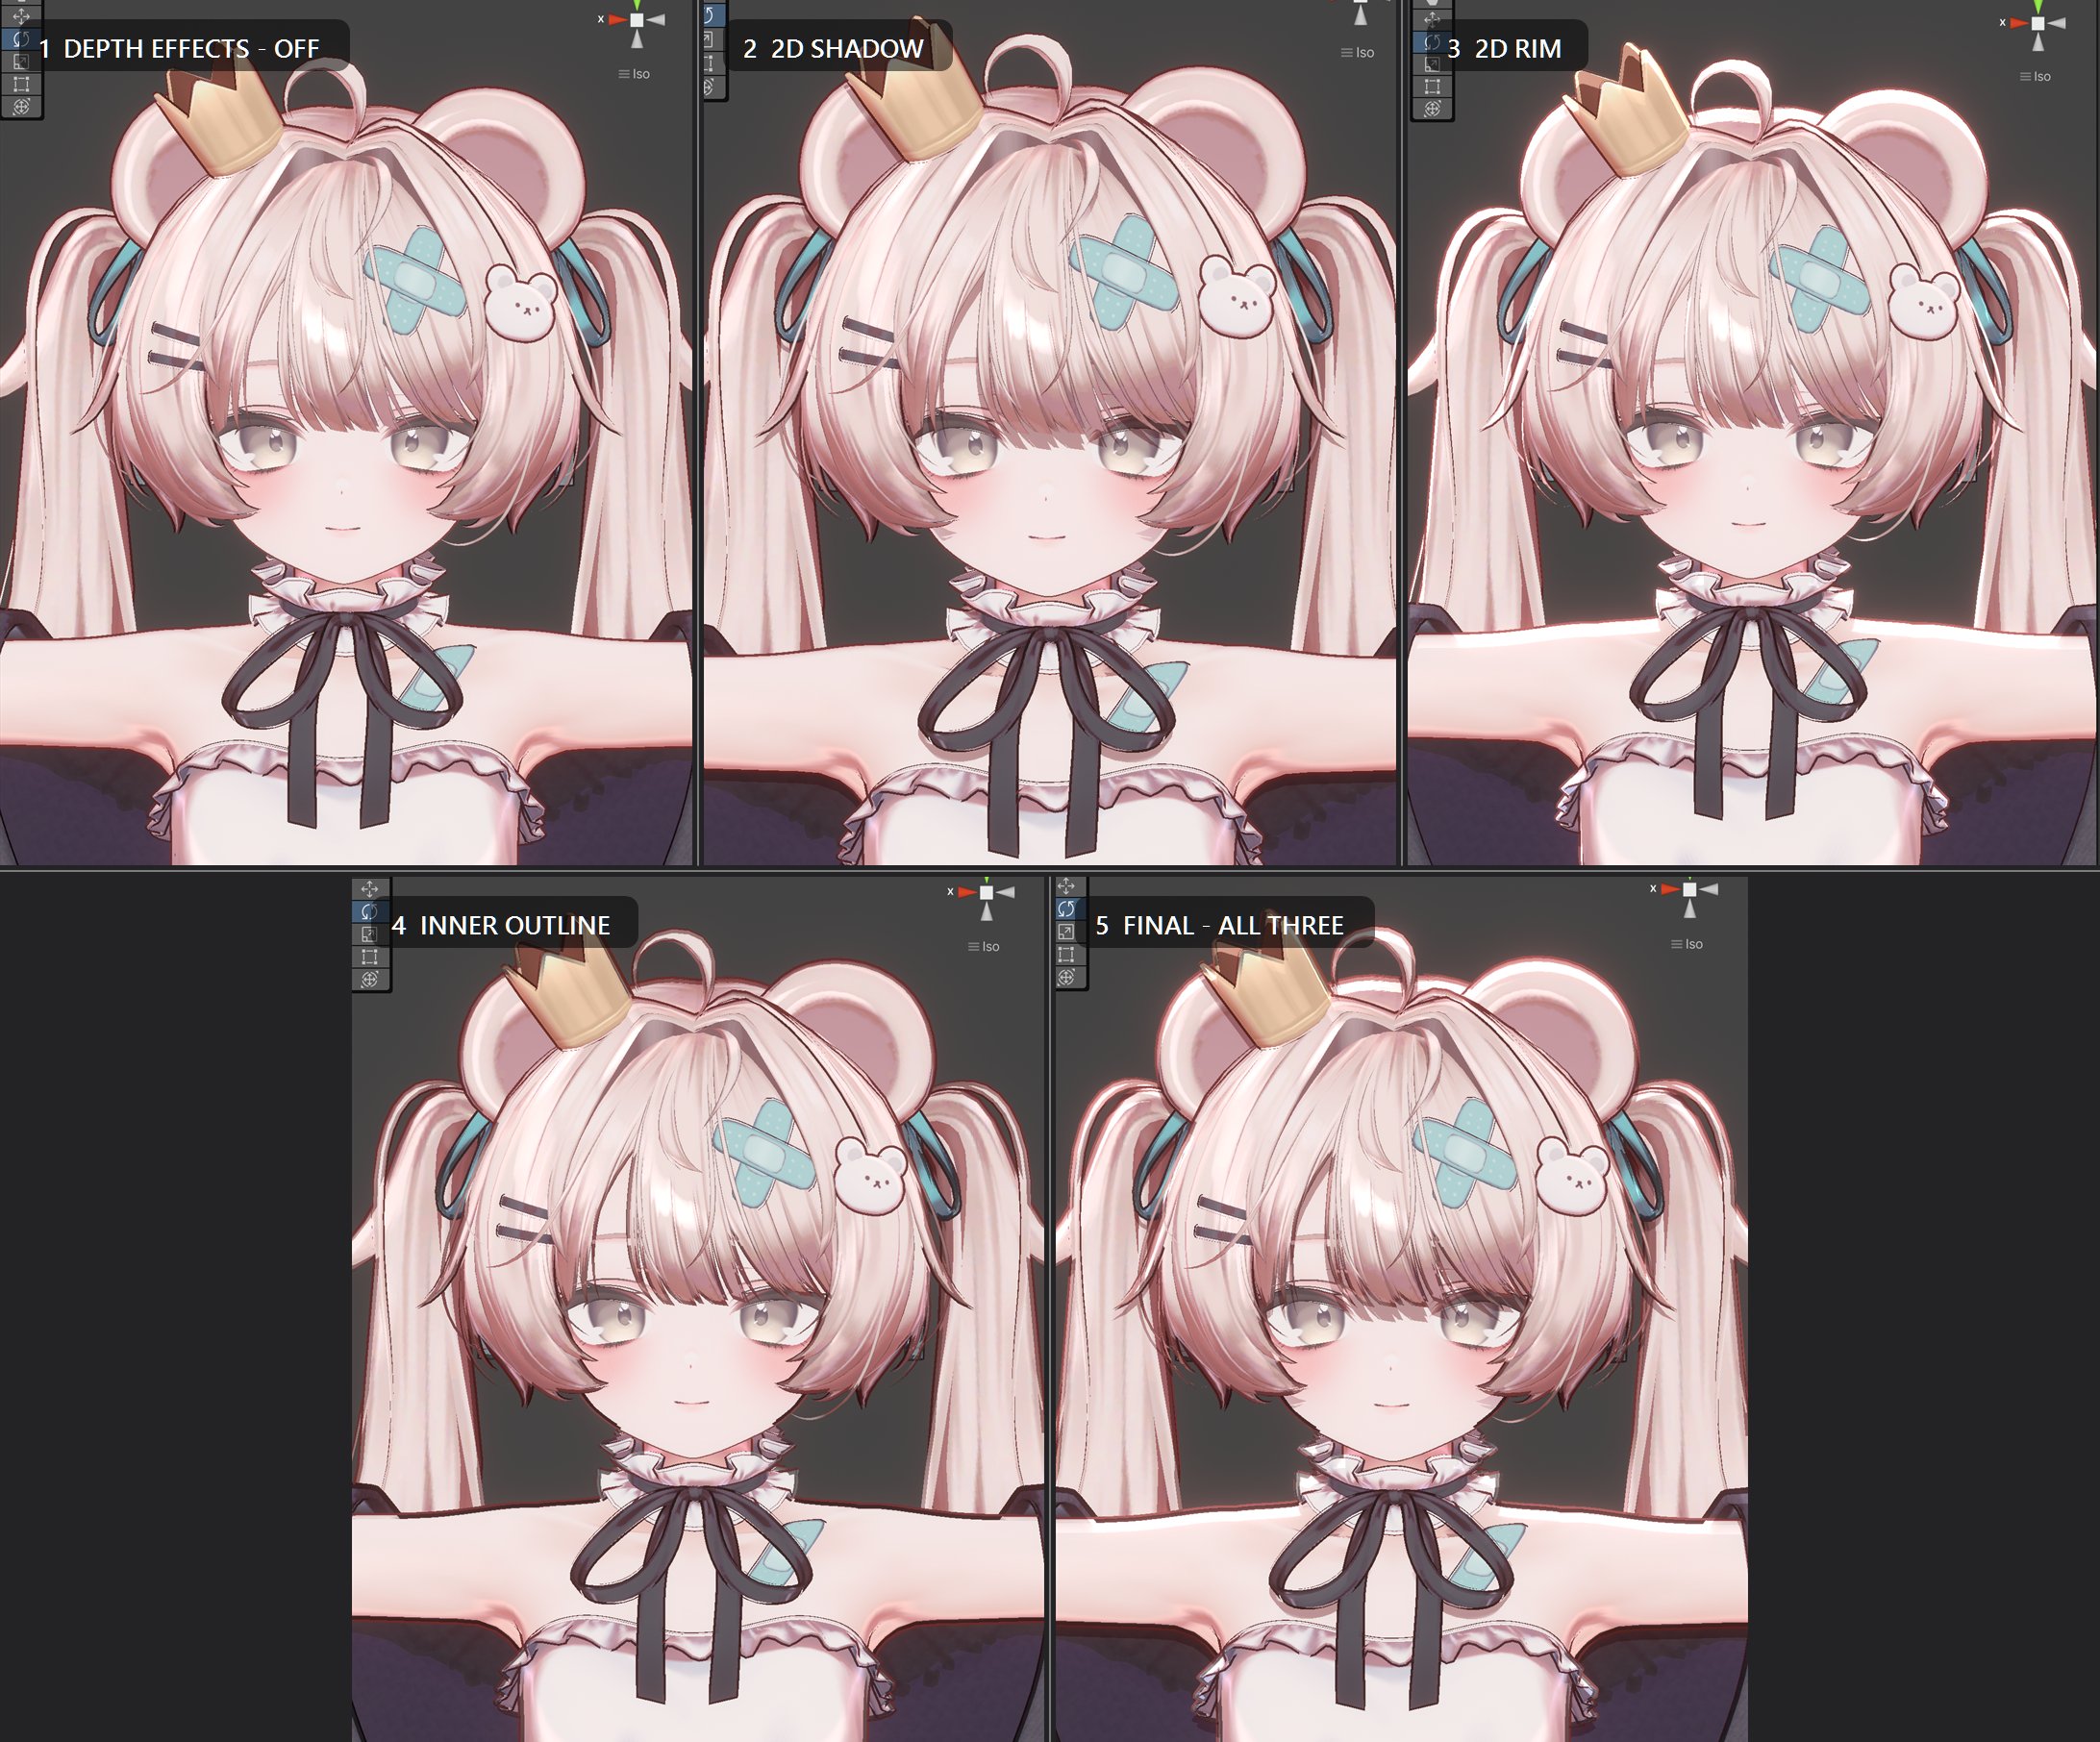
Camera depth is used as drawing data: for projected shadows, light-reactive rims, and illustration-like linework.
A four-channel Face SDF that responds vertically as well as horizontally
I also wanted direct control over the shape and timing of facial shadows.
If an anime-style face is shaded only from its geometric normals, the nose, eye sockets, and smaller surface changes can become more complicated than the intended illustration style. Flattened or custom face normals can help, but they require per-model preparation and may not behave identically after moving the model into a different host application.
MingToon therefore uses a Face SDF as the main art-direction tool for facial shading.
Many Face SDF systems primarily encode left and right lighting. This works well for a frontal character, but the face may barely respond when the light moves above or below it.
MingToon packs four directions—left, right, above, and below—into the RGBA channels of one texture.
The shader calculates the light direction relative to the head and blends the four channels. The facial shadow can therefore respond not only as the light moves horizontally, but also as it moves vertically.
The SDF is not treated as one finished shadow image. It is closer to a map describing when each region of the face enters shadow and how long it remains lit during the lighting transition.
One side of the nose may darken earlier depending on the light direction, while a small reflected highlight can remain even when the face reaches its darkest state. A cheek region may remain lit through the middle tones and finally disappear when the whole face enters shadow.
To make those behaviors easier to author, the tool separates the Face SDF into editable layers for the base shading, nose, cheeks, lips, and eye sockets. Each layer can have its own scale, position, inversion, softness, and timing strength before being combined into one four-channel texture.
The authoring tool can also generate a dedicated Face SDF UV channel from the front view of the model. This reduces dependence on the original facial UV layout.
Multiple textures and layers are used while editing, but the final shader samples only one combined Face SDF texture. No runtime script is required to apply it.
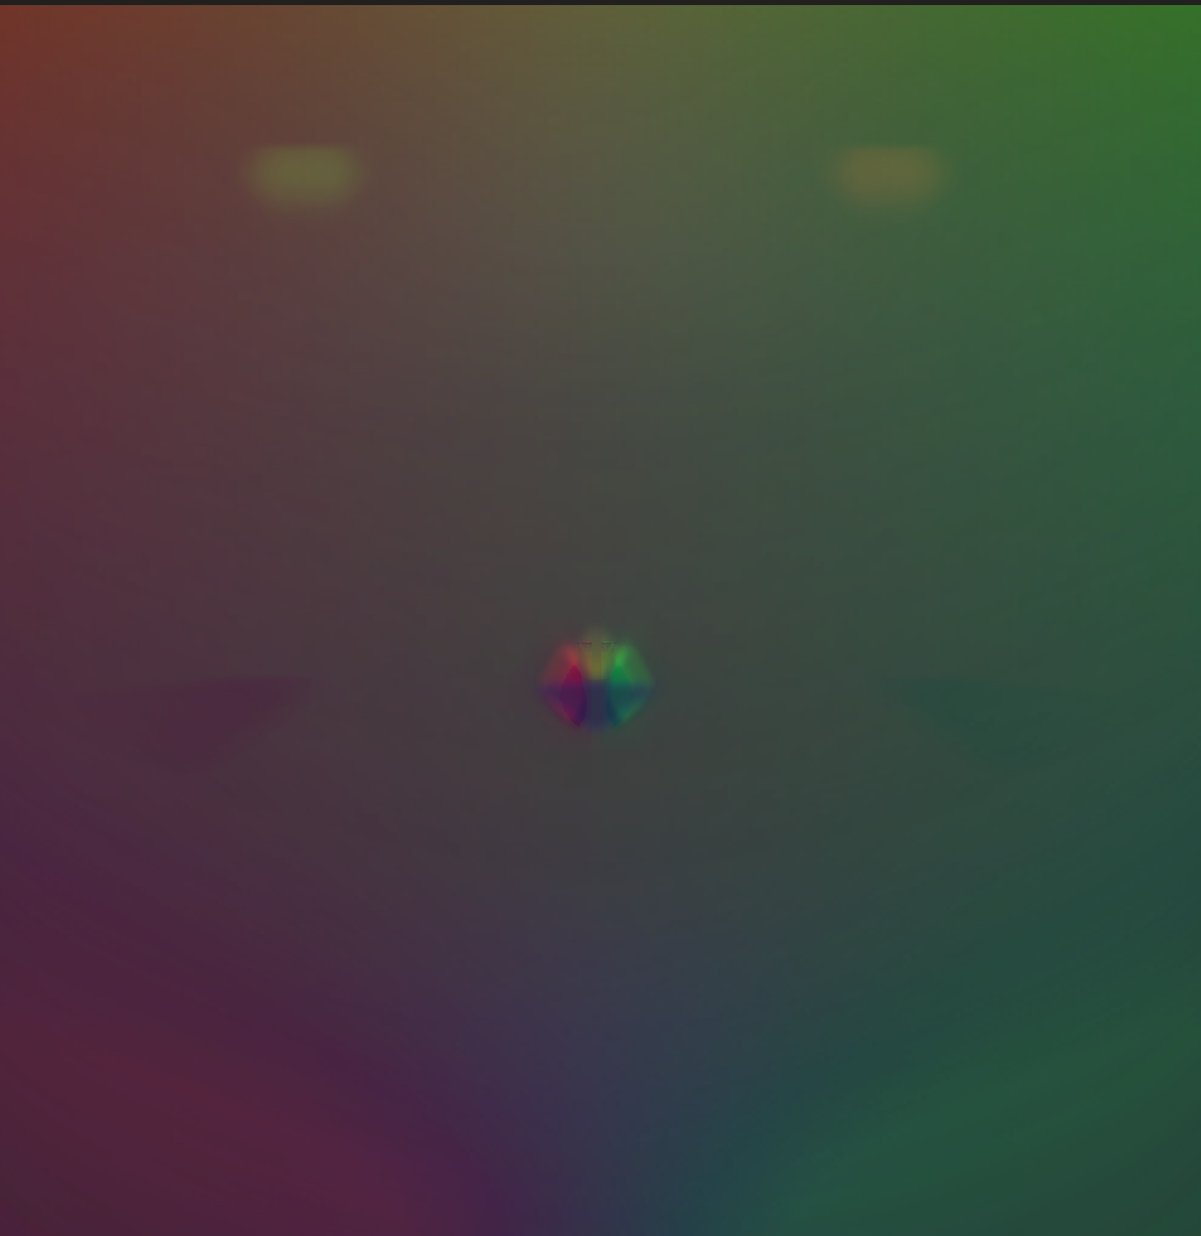
The Face SDF responds vertically as well as horizontally. Nose and cheek layers are not simple decals; they control when those regions enter and leave shadow.
Avoiding a complete facial UV rebuild for every model
Making a Face SDF easy to use also required addressing the fact that every model has a different facial UV layout.
On many characters, the face, eyebrows, eyelashes, and eye-area meshes occupy completely separate UV islands. They appear connected from the front, but a Face SDF sampled through the original UV can break at every island boundary.
The authoring tool therefore generates a new Face SDF UV channel from the front view in the Unity scene.
It does not modify the UV used by the original face texture. Instead, it writes the front-projected coordinates into a separate unused UV channel. Facial parts that are unrelated in the original texture layout can share one continuous coordinate system when viewed from the front.
The SDF layers can then be positioned and scaled while previewing them directly on the model. Once editing is complete, the layers and UV data flow into the final MingToon Face SDF.
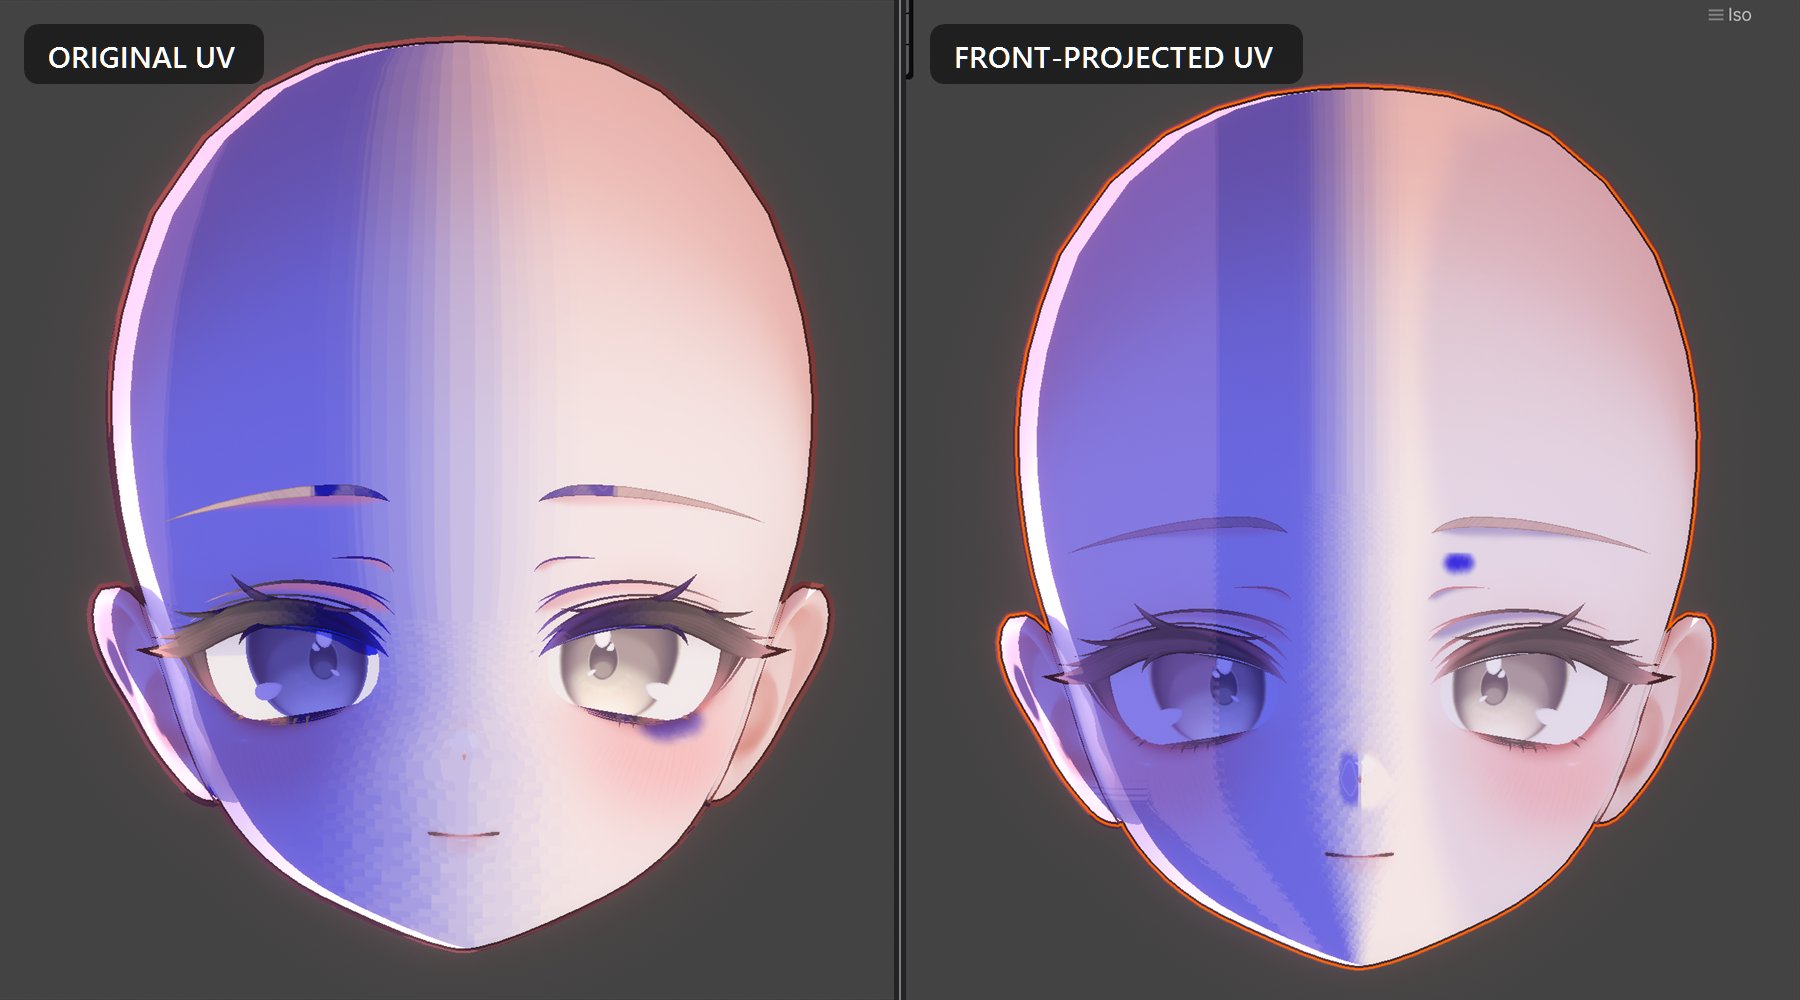
The original texture UV remains untouched. A separate front-projected UV channel places disconnected facial parts into one Face SDF coordinate system.
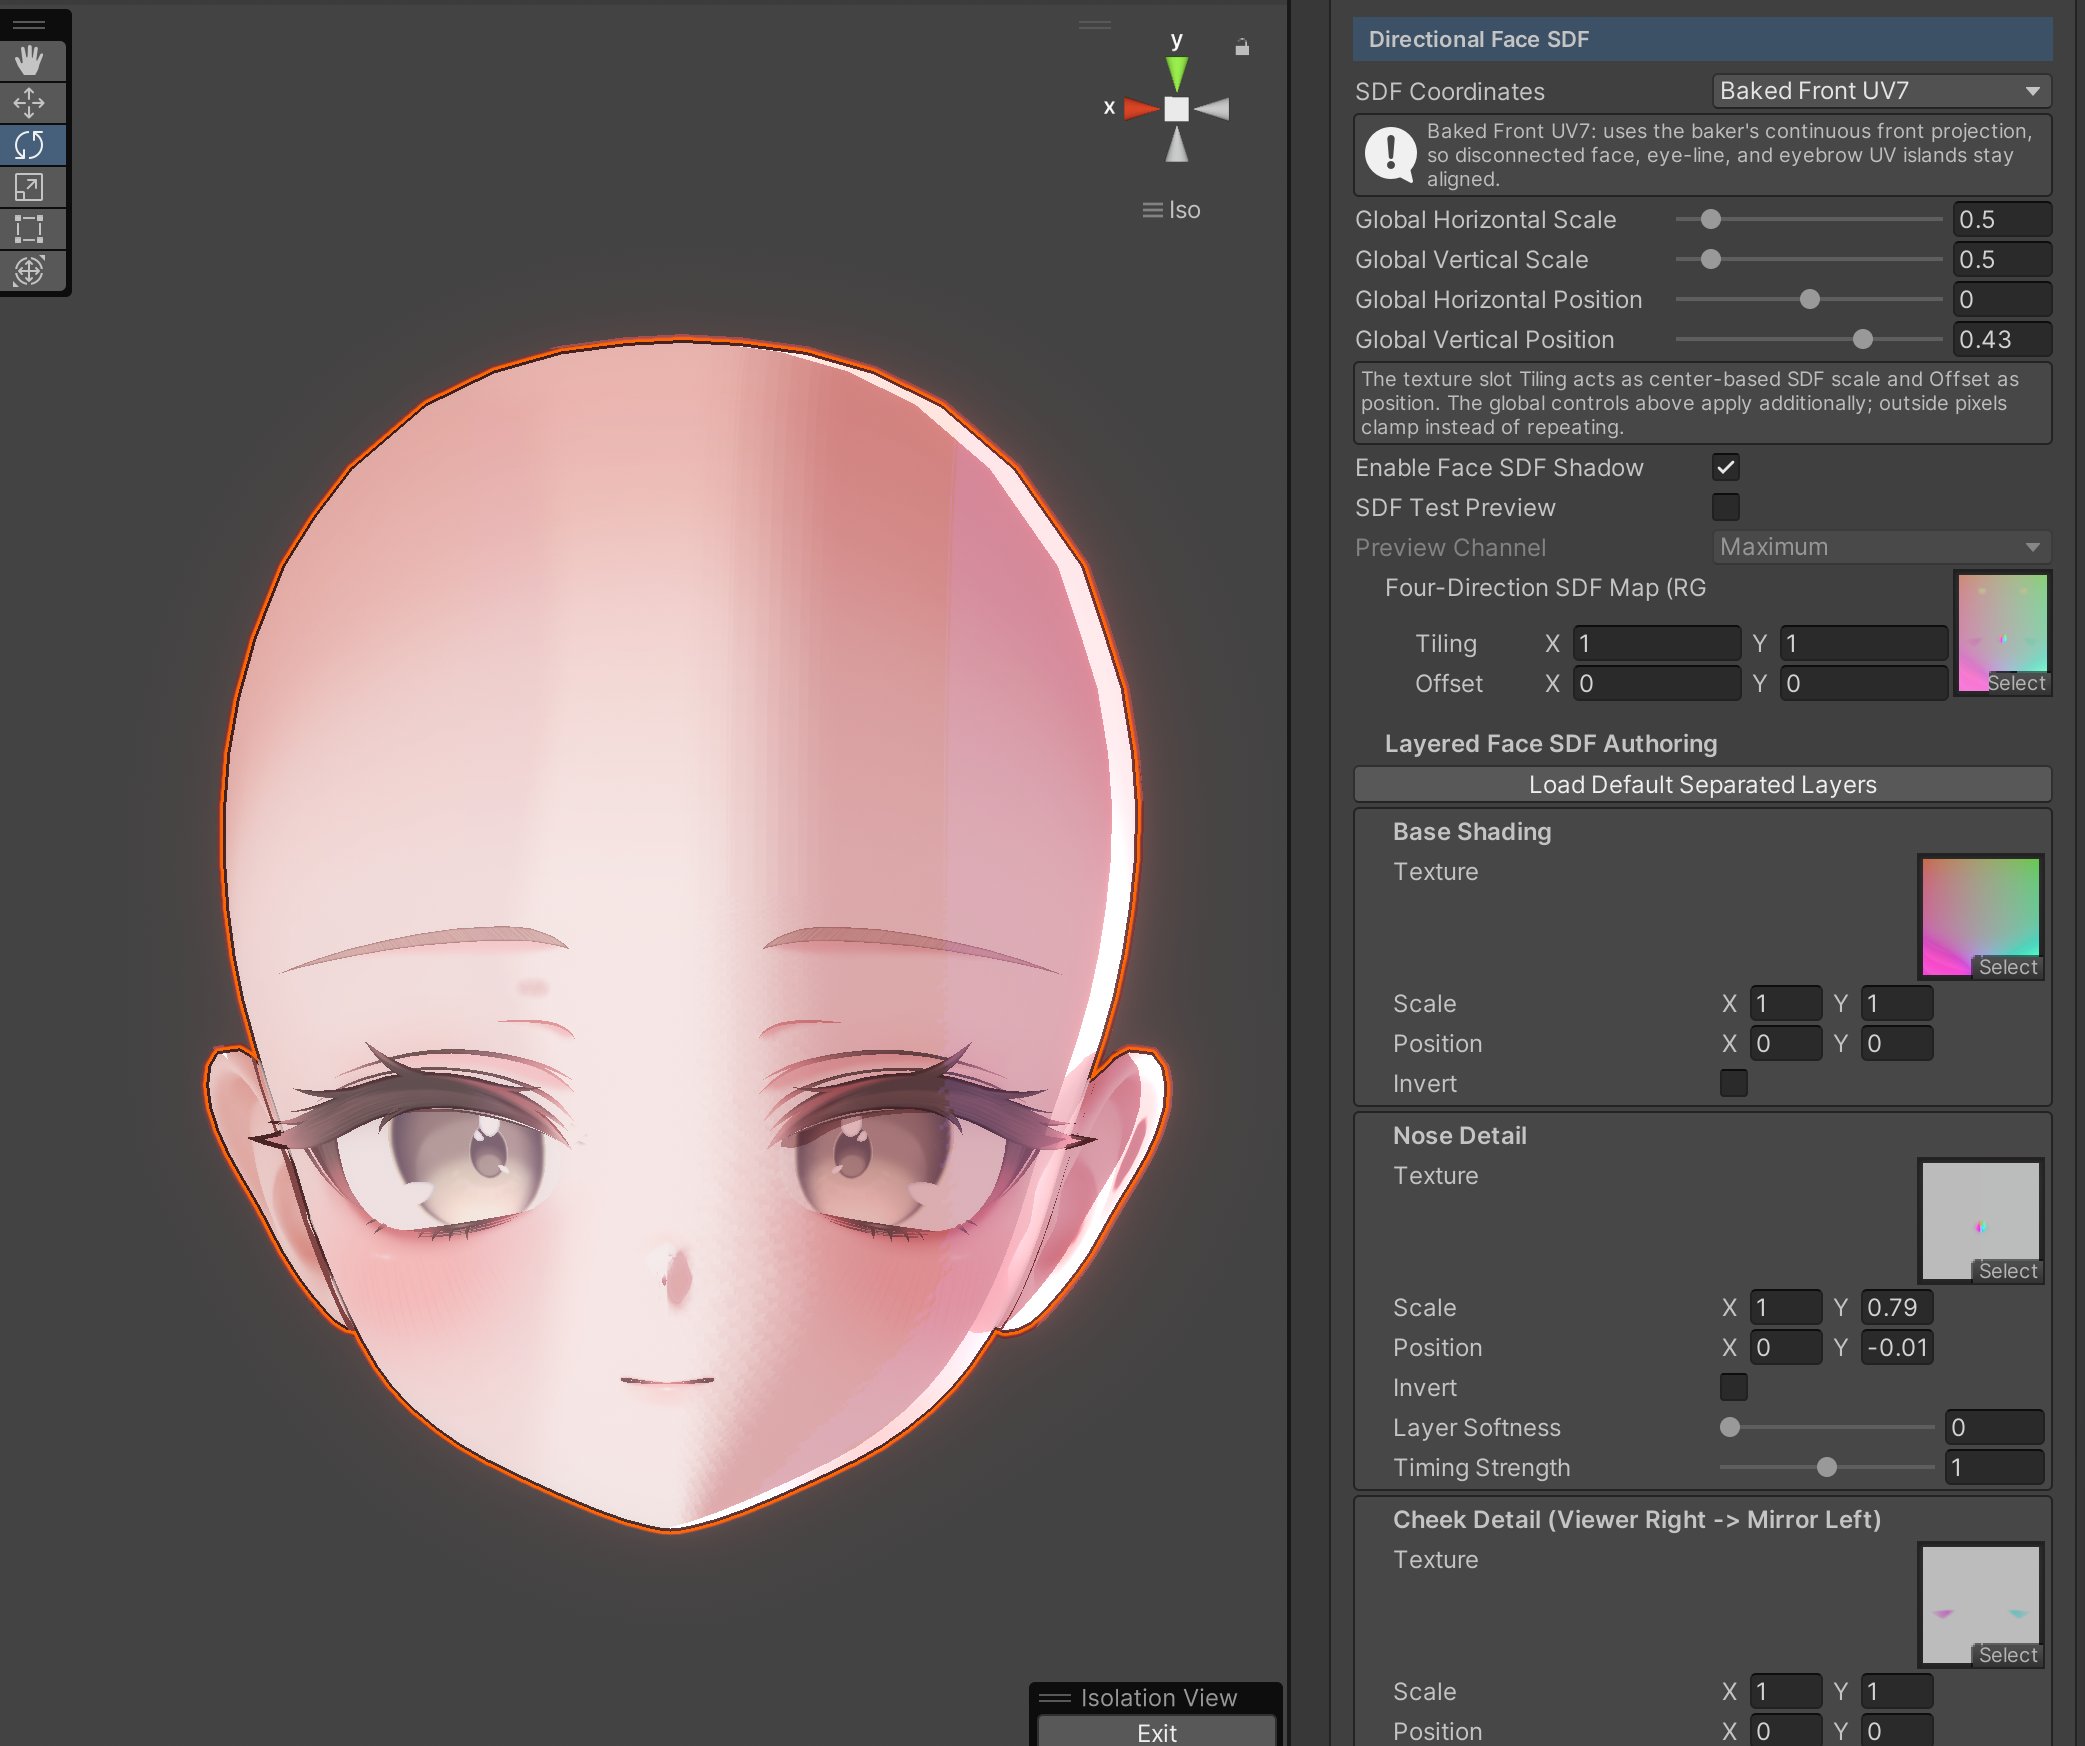
Facial details are adjusted as separate authoring layers and previewed directly on the model. The final bake combines them into one four-channel SDF
An Inner Outline for plane geometry that hull outlines miss
I want the outline to feel like part of the character’s final color and shading, not simply a black line added at the end.
MingToon combines a Hull Outline with an Inner Outline.
The Hull Outline expands the mesh and draws its back faces. It is a stable way to define the outer silhouette of volumetric geometry such as the head, body, and clothing.
Not every character part is volumetric, however.
Hair cards, eyelashes, ribbons, accessories, and some clothing elements are often made from single planes. Because a hull outline depends on expanded back faces, it may fail to draw the desired boundary of those thin planes, or it may not follow their visible shape correctly.
The Inner Outline is intended to fill that gap using camera depth.
Despite the name, it is not limited to internal boundaries. It follows visible depth changes and silhouettes, allowing it to draw the edges of thin planes that the hull method cannot capture.
It can trace the tips of plane-based hair or a thin accessory, and it can also organize overlaps between the face, bangs, and clothing in a way that resembles illustration linework.
The Hull Outline is responsible for the broad, stable silhouette of solid geometry. The Inner Outline supplies the finer linework around planes and small overlapping forms.
Used together, the hull can preserve the large character silhouette while the Inner Outline fills in the hair cards, ribbons, and thin shapes the hull would otherwise miss.
Outline color can inherit the character’s base color and final shading instead of remaining one fixed black. This allows the linework on the lit and shadowed sides to remain compatible with the current material and shadow palette.
A separate color and blend mode can then be added on top, ranging from soft colored linework to a stronger comic-style outline.
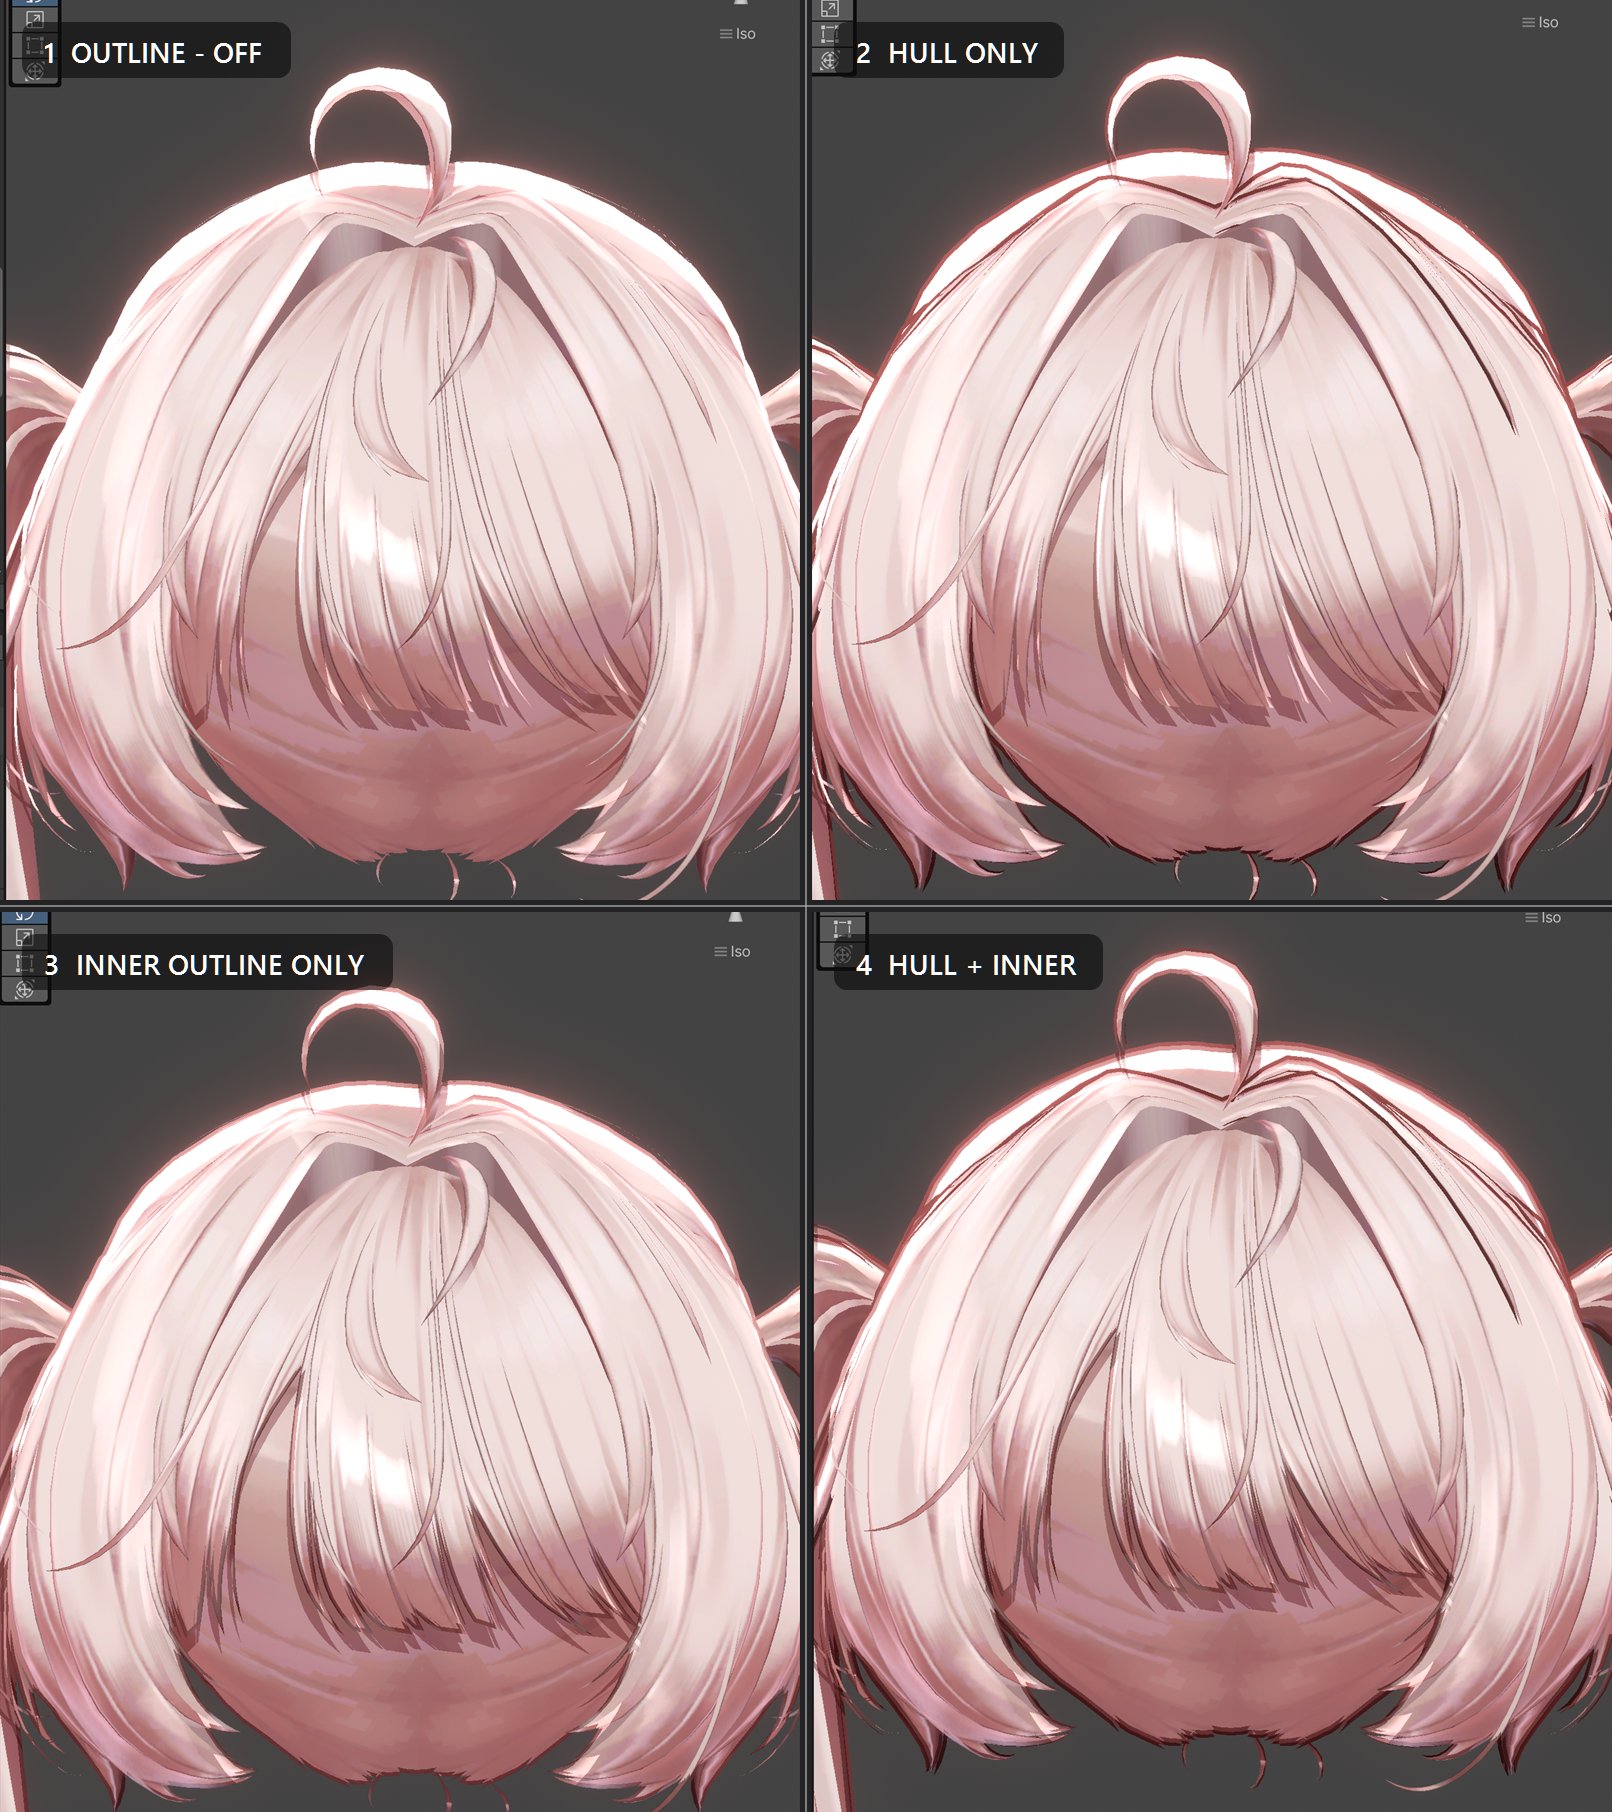
The Hull Outline stabilizes the silhouette of solid geometry. The Inner Outline restores the edges of plane-based hair and thin accessories that a hull cannot reliably draw
Combining many forms of character shading in one place
MingToon also includes the surface tools I frequently need while building character materials.
It supports a base texture and alpha masking, up to ten texture-stacking layers, five normal layers, and five MatCap layers. AO, emission, metallic or specular PBR workflows, and multiple color blend modes can be combined in the same material system.
The intention is not to enable every feature on every material.
Skin, hair, fabric, and metallic accessories all need different treatments. Instead of creating another shader every time the material type changes, I want those treatments to be selectable from one authoring environment.
As the feature set grew, the Inspector became just as important as the shader code.
The Simple mode exposes the controls used most often. Full mode contains every layer and advanced option. Bulk mode edits shared settings across multiple materials. Search, localization, presets, module-level toggles, and per-property reset controls are also part of the workflow.
I am also building a conversion path that carries common textures, colors, masks, normals, and MatCap settings into an editable MingToon material.
It is not meant to produce mathematically identical pixels between two different lighting models. It is meant to provide a useful starting point instead of requiring every converted material to be rebuilt from zero.
Full-featured while editing, reduced to what is needed at runtime
A full authoring shader with many modules cannot be as simple as a tiny shader written for one effect.
That is why MingToon separates the goals of editing and runtime execution.
The editable shader is always the full version. While building the material, every module remains available without constantly switching between different shader files.
Before final use, the bake system analyzes the material and generates a shader containing only the features that may actually be needed.
Zero-strength depth effects exit before sampling depth. Additional lights that cannot contribute are rejected before expensive lighting work. Repeated depth and lighting values are shared. During baking, unused modules and unused layer counts can be removed from the shader source entirely.
The analyzer also considers AnimationClips and Animator references. A module that is disabled in the current Inspector may still be enabled later by an animation, so the bake process preserves features that have a real dynamic dependency.
For VRChat, the target is a final avatar that does not depend on custom runtime MonoBehaviours. Unity authoring tools may generate the Face SDF UVs, compose layers, and analyze features, but the finished result should consist of the baked shader, materials, and textures.
MingToon is also being kept usable as a character shader in Warudo, including its free edition. However, Warudo is often used for streaming and monetized activity, so that usage should not automatically be grouped together with personal non-commercial use.
A shader for convenient look development, not a claim to be universally fastest
Because the editable shader contains many features, I cannot claim that it is inherently faster than every small specialized shader.
Instead, I am optimizing the places where work can be removed without sacrificing the intended look.
A zero-strength depth effect exits before reading the depth texture. Additional lights that cannot contribute are skipped before the expensive shading path. Repeated depth and lighting calculations are shared, and the default outline mode avoids tangent-space work it does not need.
Even so, I do not want to convert a source-code reduction directly into a universal FPS claim.
Real performance depends on avatar geometry, transparency, overdraw, light count, camera count, and the target GPU. Until the comparisons are reproducible under matching conditions, I would rather not describe MingToon as the fastest option.
For one narrowly defined look, a short purpose-built shader may remain the better tool. For creators who want to combine many toon techniques across different characters and materials, a full authoring environment followed by a reduced bake may be more convenient.
MingToon is being built for the latter case.
I want to see what other people make with it
When MingToon is ready, I plan to distribute it free for clearly personal, non-commercial use.
The main reason is that I want to see how the shading methods I have used in Warudo and other virtual-avatar projects are interpreted across many different VRChat characters.
Posting shader work on X has repeatedly shown me that the same feature can create a completely different impression depending on the model’s face, texture, palette, lighting, and the artist using it.
Seeing only the handful of demos I create would be less interesting than seeing many VRChat creators adapt it to their own avatars and tastes.
One person may use the colored shadow border as linework. Another may make the backlight-reactive 2D Rim part of a character’s signature look. The four-channel Face SDF may also produce styles and shapes I never considered while building the default examples.
I want to see those results, learn from the unexpected uses, and feed the weaknesses discovered by real projects back into MingToon.
Streaming or monetized broadcasting in Warudo can be connected to commercial activity, so I plan to define that usage separately from free personal non-commercial use.
MingToon is not a summary of many years spent making VRChat avatars.
It is closer to an attempt to carry the shadow, backlight, and depth-based techniques I have explored in Warudo and other 3D virtual-avatar applications into a form that can also be used in VRChat.
My choices may not be the correct answer for every character, and MingToon may not be the smallest or fastest shader for every project.
What I am trying to do is bring together the techniques I have found beautiful while using and building many different toon shaders—especially the treatment of shadows, backlighting, and camera depth—and make them convenient to combine in one place.
The shader experiments I used to post one by one on X are slowly becoming parts of one system.
Original article by Raming ( ´∀` )b (@kim_raming): View on X.
Avatar model: BOOTH item 6571299.